Posted on 3 Comments

Worth it!

I still haven’t finished my quilt top.  But for a good reason!  We ran a test indigo dye class with friends.
We have dyed on our own but really want to share the fun with more people so we experimented on some of our friends
Don’t we look organized?
We happen to have amazing, creative and fabulous friends so it was bound to be fun even if we did everything wrong.
We set up a Shibori (tie dye) station.
When collecting scissors, marbles and other fun stuff starts to feel like work, I’ll let you know.
To me it just looks like treasure.
Why else would I take a picture of rubber bands?
We had some Shibori half way put together to share some techniques.
There were samples to show and, because I just have to be me, library books for reference.
The library is an amazing resource, yo.
 
Then we were ready to get serious.
This is about the time that Miranda (of Miranda Beyer Photography) started taking pictures.  You can tell which ones are hers because they are beautiful.  She specializes in newborn baby pictures but every picture she takes looks awesome, she has a great eye.
I make my own Kombucha but I happened to have a bunch of Nessalla Kombucha for some guests.  I decided to forgo getting my bottle deposit back so we could use their growlers to tie fabric around.
When I see what folks made using the bottles…
…all I can think…
…is…
 
Worth it!
We tied.
We dyed.
We untied.
We revealed and then…
…we smiled.
Check out these socks.
We were all in it together.  Here three people are undoing the shibori stuff because we can’t wait to see…
This!
This yarn is ombre dyed and knotted so that it achieves a kettle dyed look.  None of us quite knew how to do it but Tanya was willing and excited to experiment.
And it worked really well.
Here are three pieces made by a woman who said she wan’t a crafty person.
…seriously…
What was she thinking?  Her work is awesome and creative.
Another woman who said the same thing.
I’ll never believe them again!
Everyone felt really comfortable trying out new techniques.
Indigo is a great medium to play with.
A great and messy day was had by all.  We plan on offering an indigo dyeing class this fall in Madison WI.  You can follow us on Facebook and/or Twitter to get an announcement closer to the date if you’re interested.Now get out there and make a creative mess.  I will too.  I’m gonna finish that quilt top, dang it!
Posted on

Ready Freddy

I only need to make one more log cabin square to call this ready, Freddy.
Making it into a quilt top, though, takes more time than you might think.
That’s because I don’t make each square a certain size, I just sew them together until they are around about the same size.
When I sew the squares together, I often have to add a strip here and there.
I could cut the squares down but then I’d lose so much of my precious squares and I would be sad.
Can’t have that.
Posted on

Big Messy Pile In My Garage

Remember when the fabric we dyed with indigo told me it wanted to be a quilt?
I didn’t listen right away.  First I made some napkins.
 
Then, for some reason to do with people visiting and using my car and me being disorganized, it all ended up in a big messy pile in my garage. That’s right, the garage. 
But now it’s all alright because I spent my afternoon sewing it into quilt squares.  
Have I ever mentioned – over and over again – that I loooooooove improvising a quilt together.  Love it.  I can’t imagine that following a pattern is even half this much fun.
I also love linen and have taken a ridiculous number of close up
and far away
 and close up pictures.
I made seven squares today.
I’ll probably make nine all together,  Maybe twelve, I don’t know.
I think this is my favorite.  
So here’s another picture of it.
This one I’m going to just keep in one piece.
I haven’t sewn for a while and it was so fun to do.  
I remember once telling a friend of mine that I had figured out how to make quilting go really fast.  Then I realized that I didn’t actually speed up the process, I was just enjoying myself so much that time was flying.  
Posted on 2 Comments

I Stained The Driveway

We ended up with mixed results from our rust dyeing.  
Jennifer had two big pieces of canvas.  This one ended up looking really cool.  
One day soon, it will be an apron.
The other one should have been really amazing, she placed in on coils of wire.  But they didn’t rust, we figure they must have been coated.  
This part sat on the outdoor fireplace grill – a very popular piece.
But this one is fabulous and we learned to test metal first.  If you get it wet and leave it out, you’ll be able to tell if it will rust or not before you play with it.  
I love this, it’s from the grill of the smallest hibachi I’ve ever seen.  Smaller than the one in the link.
This one was wire wrapped around rebar.  It’s my favorite of the stuff I made.  
The lines are from the wire.  
I think it was floral wire – not sure though.  That’s what happens when you buy your supplies at thrift shops and yard sales.  🙂
This is from where the rebar touched the fabric.  I like this part, too.  We’re going to find some larger tubes to wrap fabric around so that more of the fabric gets color.  We’re thinking wine bottles or large pvc tubes.   Stay tuned.
Here’s a sweet little piece that I put on some rail road ties and steel scrubbies. 
 I don’t know how I feel about it, it’s a bit too something something for me.  Geometric, maybe?  
  
I love this.  It’s a sleeve from a horrifying lilac linen jacket – plus sized with a very unflattering cut – it needed a change.  I laid it on top of a steel screen from our outdoor fire pit.  
I love the all over pattern from it.  
This sleeve I wrapped around a rusty wrench with some various washers and metal doo-dads added in.  Its pretty cool, too.
Psychedelic man!
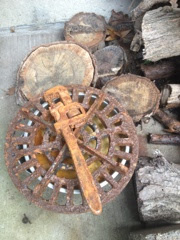
And here’s the shirt.  I think I like it.  I put it on a drain cover that I found on the side of the road several years ago.  I picked it up because…just because.  
This is the back.  I like the front better than the back.  I covered the stain I wanted to cover.  But all over, I’m not nuts about the look.  It looks stained more than dyed.
Here’s the apron with my bonus shadow.  The apron just looks dirty to me.
Up close, if I were to take the time to appreciate the details, I like them.
But parts also just seem dirty to me.  I think I like the all over patterns better.  The splotchy bits don’t work for me at all.  
Next time – and there will be a next time – I might pick up some iron oxide powder.  You can sprinkle it on the fabric and it colors more of it.  I’m hoping the color will look more intentional.  
Also, it took more than 24 hours because we moved the rusty pieces around to different parts of fabrics to dye more of it.  The difference between vinegar and salt was only in the smell.  I didn’t see a difference.  
We learned a ton.  We’ll be trying this out again maybe on a smaller scale.  I laid out a tarp in the driveway and it took up lots of space.  Jennifer came up with the idea of just putting a piece in a plastic bin.  We could always have a piece rusting if we chose to.  It takes up less space and probably wouldn’t stain the drive way.  Oh yeah, I stained the driveway.  
Posted on 2 Comments

Rust Dyeing

Time to try something new.  
It seems a little whack-a-doo but that never stops me from trying something.  
In fact, it kinda makes it more tempting, doesn’t it?
The idea is pretty simple.  You take some metal that will rust and put it on or wrap it in some fabric.
Get them wet to encourage rusting.  
We added vinegar to some of the pieces and salt water to others to see which would encourage rusting  better.
I’m thrilled to be rusting this shirt.  It’s an Alabama Chanin design that I made with an old tee-shirt.  It fits me really well but I stopped sewing at this point when I saw the very light but also really big stain on the front.  Oh, that’s why that shirt was in the thrift shop.  So I’m rusting over the stain here, fingers crossed.
Bottle caps on a linen sleeve that is resting on a grate.
Soaking some washers and bottle caps in salt water.
The tool chest, including my ubiquitous cup of tea.
I looked for spray bottles at the dollar store but couldn’t find any so I bought these cool water cannon things.  
Way more fun to use than spray bottles.
These are Jennifer’s pieces, at least one is destined to be an apron.
Then we covered everything with a tarp.  We just need to keep it wet and hope for the best.  It should take about 24 hours to get rusted.  
Have you ever rust dyed? I’m curious to hear about people’s experiences.  
Posted on

Busy

Some of the things that have been keeping me busy lately. 
Dying with rust.  That will get it’s own post soon.  It’s totally fun.
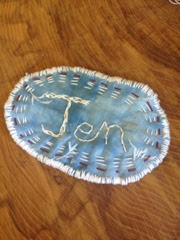
A name tag challenge via my Modern Quilting Guild.  I used some of the linen that we dyed with indigo and was inspired by denim badges of the seventies.  Funny how even when I don’t use denim, I use denim…sort of.
And my parents have been visiting.  During which time, my husband and father put up a shed and we (Well, mostly they and a little bit I) built a coop and run for the chickens.  It’s not quite done yet but it’s incredible sturdy and I’m thrilled with it.