Posted on 1 Comment

Time to Get Busy

 Time to get busy.  I want this tree trunk coffee table in my living room before my company comes for New Year’s!
One side of the slab was 6 3/4 of an inch and the other was 7 1/2 inches so I had some evening up to do.  I went to the good old ReStore and bought some 1/4 inch thick flooring pieces.  Putting the pieces on three of the four corners seemed to level it well enough. 
This is level enough for me. 
 So I gathered my tools and went to work.  First I carpenter glued the flooring pieces to the trunk. 
I used the wheels as weights for the 30 minutes the glue needed to set.  That way I could gawk at what was to come.
(A quickish digression: My husband actually helped a ton with this project.  He cut the wood flooring for me and got the screws and did all the heavy lifting.  It made sense that he should come along to the Woodcraft Store – the guy there had been really helpful before – to help pick out the wheels and just so we could hang out together.  We like hanging out together.
But the guy at Woodcraft only talked to my husband when we were in there trying to figure out which screws to use and what to look out for and whatever other details an experienced woodworker could help with.  I felt practically invisible.  My husband didn’t really notice as this has never happened to us before.  It was exceedingly frustrating and added so much tension to our day.  I have a little sour taste left over still.)  
Back to business.  The evil dude at the wood store recommended these fancy 4 inch screws.  We also had to buy (Not from the wood store, mind you, they don’t sell them there) a special drill bit because we needed more torque to get them into the hard wood.
Fancy.
 First pilot hole drilled!  There’s no going back now!  Every step felt that way a little. 
Then I hit a snag.  The drill couldn’t handle the length of the screws.  It actually started smoking before I gave up.  I had drilled the pilot holes as deep as I could go and the screws were still sticking out at least an inch and a half. 
So we switched to 2 1/2 inch screws and yet another fancy drill bit.  Problem solved.  It added a day to the project but that kind of stuff is bound to come up. And when you procrastinate as well as I do, a little delay is no big deal.
The only thing left do was lug that beast up a flight of stairs!  We used a dolly and didn’t swear at all.
Tada!
 Now for the gratuitous finished project shots.

  
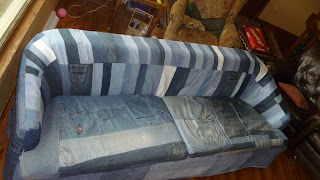
This is my living room.  Just to brag a bit:  That’s my jeans couch with a scarf pillow and two stuffed woollies and a linen quilt, all of which I made. To the right you can see a bit of the chair I reupholstered.  And my antenna is perched on an antique toolbox I cleaned up.  A pretty handmade home for my patchwork life. 
I’ve been waiting to do exactly this for months!  My company is due in an hour…Happy New Year!
Posted on 3 Comments

Process Post

Before
After
It doesn’t look that different, does it?  But I did spend a fair amount of my yesterday making this second curtain panel the right size for my window.  I expanded it along two sides so that it would fit my kitchen window.  Now I just need to figure out how to mount it.  I need to be able to open it.  I have a pretty good idea, I’ve done this before.  I need to buy some dowel rods and rings so I’m at a stopping point for now.
There is something so satisfying about freshly ironed linen.  It can really stand up to a super hot, super steamy iron.  That kind of ironing brings out the best in linen – though when I wear linen clothes, I just embrace the wrinkles.  It’s one of my favorite fabrics.
I sewed the two squares together in a long chain to preserve thread but also to be more efficient with my time.  It still took me hours and hours.  
Fun hours but still…hours.
Before and After
 That’s right.  My before on this quilt is the exact same as my after.  I still can’t commit to the background fabric for this quilt.  I did lay them out a couple of times to see that they may end up looking like.  I sometimes think that I’d like a quilt made only of the corduroy.   PS – Check out the stuffed animal on the couch.  I made her out of an old wool coat about a year ago.
I did steal away one square to patch a worn spot on the sofa.  
Apparently, denim wears out whether the ass is inside or outside of the pants. 
 I picked the patch I did because it just had a few lines of embroidery.  That way I could add some more while attaching it to the cushion.  I extended some lines beyond the edge of the patch just for fun.  
I also used some thread made just for sewing denim – it ends up being relatively invisible – around the edges in the hopes that it stays on well.  I’m tempted to add some fray check around the edges just to be safe.  
We do get a lot of asses on this spot.
Posted on 5 Comments

Finally for real!

Seat cushions on ‘A’side
I’m calling this DONE!  It’s probably about a year of work and avoidance of work to make this couch cover.  I’m ridiculously proud of it.
‘B’ side
I consider it done just today because this is the day I attached some elastic loops around the legs to hold in in place.  It’s looked finished for weeks.
Here’s the seat back.  I’m glad I took months and month off because in that time I made some quilts and came up with this piecing idea.  Everything else I had tried before was super awkward and had stumped me.  One vote for procrastination!

By the time I really figured out the piecing thing, though, I had reached the back of the couch , you know, the part that sits up against the wall.  It’s my favorite part.
So here are some of the details.
These pictures are just for the record because no one will ever see it unless I completely rearrange my house.  Don’t think I’m not tempted.
Remember this post? (Scroll to the end)
You’re still welcome!  
Thar she sits, in all her glory!
 
Posted on 2 Comments

Couch

What’s up with the pile of jeans?

My latest crazy project in full procrastination mode.


Cushions and front are done but I’m stalled at the arms and the back.
I hope to have it done by Christmas…