Posted on 1 Comment

Mail Art Extravaganza!

Feel free to ignore the laundry, I sure did!
 Yesterday I made a colossal mess and
 
Twenty six mail art postcards!  
I’m planning a major mail out in the next week or so. 
I’ll post more details on my mail art blog…soon…ish.
Posted on 3 Comments

The Things I Didn’t Buy And The Thing I Did

 
 Yesterday was a thrift shopping day and I came upon a goldmine of crazy.  Someone’s collection of ceramic figurines, all of them elderly.  In addition to this shelf full, there were about 20 more scattered throughout the store.   I couldn’t bring myself to buy them.  I just felt like I had to have them all or none of them and, while my husband really appreciates many of the horrifying ceramic things I bring  home, he wouldn’t if I spent $60 to $80 on one haul.
Then I went to my local grocery store and happened upon this:
 
For sale for $18.95 and totally ironically cool.  Which was hugely disappointing because I already own this:
 
Bought for a buck at a yard sale, under the impression that it wasn’t supposed to be ironically cool.  I don’t know how I feel about it any more.  
 
But I am thrilled with this purchase.  It’s the door to an old PO box.  I bought it at the post office.  The woman behind the counter gave me a quick lesson on how to pick the lock, too – which was priceless. 
Posted on 1 Comment

No Brilliant Reason.

I made a book!  One of my mail art groups wants to have a journal swap so I made a journal.  It’s full of mistakes but I’m good with it.  I learned a ton.    It was so fun to do; I see more journal making in my future.
 
I used Coptic Stitch Binding (I’m sure that doesn’t need to be capitalized but it somehow seemed appropriate). I learned about it in How To Make Books by Esther K. Smith.  I used a cereal box for the covers and embroidery thread for the binding. 
 It also gets two pictures because it’s an awesome technique.  It was the first time I tried it and it’s a little loosey goosey.  
What’s that you say?  Didn’t I just buy a binding machine?  Why am I binding this by hand?  
I got nothing.  No brilliant reason.  Leave me alone!
Sorry.  I know you’re just looking out for me.  
I used paper bags to make the pages.  I used this technique to make them look cool.  I also added some envelopes as pages.  The idea of the swap is that everybody adds to the journal and then passes it on, so I wanted to make different options for people.
 
One of the cool things about this binding is that the book lies flat and I hope that will make it easier for people to add their art work.   It’s a long term project but I will post some pictures of it here when I get it back.
Posted on 1 Comment

A Bunch of Different, Totally Random Stuff.

At first she’s cute
 but as she comes towards you, you see that
 SHE”S SCREAMING AND SHE’LL NEVER STOP!!!!!!!!!!!!!!!!!!!!!!!
…sorry…
I haven’t been on  the computer much lately but here’s a bunch of different, totally random stuff…
 
 Finished the Darkside Cowl
 
 Here it is in action
Phrenology head was feeling pensive…

Splurged on a Tom Bihn bag.  It’s pretty cool but I can’t help thinking…it’s just a purse.
This is what my thought process looks like..apparently…because that pile just sits there while I think about it
 
This is the time of year when I garden.  I have a black thumb and don’t like to buy plants until they’re on sale since I’m going to kill them anyway.
 
Also, because I don’t have enough collections, I bought yet another glass insulator thing.  Isn’t it cool?
Posted on 3 Comments

Unrelated News

Check out my awesome yarn bowl.  My sister in law got it for me for my birthday.  I love it.
I’ve been partaking in some transitional crafting.  The last time I finished a big project I felt down for little while.  So, this time I decided that knitting would be the perfect in between thing to do.  It’s doesn’t take a ton of concentration – especially when using someone else’s pattern – and it’s fun to do.  And it worked.  I’m making the Darkside Cowl out of Noro Retro that I impulsively bought at a Sow’s Ear knit night.  Phew – lots of name dropping there. It’s a very fun knit and I’m sure it’ll get lots of wear.  
On to destruction:
That’s right.  I took the unfinished half of a baby quilt that I had left over and unquilted it.  I was never in love with it and I realized why the other night.  It’s the colors.  
They are great for a baby quilt but these denim blocks don’t really want to be a colorful baby quilt.  They’re too regular and tidy (relatively, for me).  
They want a neutral color thread.  Can you hear them asking?  I can.  I will need to remove the border and separate at least some of the squares but I think it’s for the best.
In unrelated news, one of my chickens laid her first egg.  🙂
Posted on

Invisible Stitch Mini-Tute

 Here I’m holding the mitered corner in a death grip so I can make sure it lines up in a nice and tidy way.  I’ve sewn the corners of the binding where I want them as I hand sew this side of the binding to the quilt.  Then I’ll tuck the extra fabric into the corner and tack it shut with a stitch.  I wish I’d taken a picture of that.  I’ll get it next time I make a quilt.
I took some pictures so I could post a quick little tutorial on how to hand sew a quilt binding on, using an invisible stitch.  It always seems like magic to me.  
The binding fabric is folded under just a bit.  I’ve machine sewn the binding onto the other side of the quilt so there is a line of stitching on this side that I need to hide under the binding fabric.  I also try to make sure it looks even across the quilt edge but other than those two things, I’m not very careful
I put the needle into the flannel and follow along the line of the binding, right up close to it, for just under about a half and inch.  I pull it out and…
 then put the needle into the binding right next to where it came out of the flannel and make just under a half inch or so long stitch in the binding – always pulling the thread nice and snug.  I pull the needle out and …
 do it again on the flannel side.  That way the thread is hidden under the fabric and the stitch is invisible.
 I just keep moving along that way all along the binding.  It’s always surprising to me how fast it moves along. 
Posted on

Mitered Corner Mini-Tute

The first place I saw this technique was in Bend the Rules Sewing by Amy Karol.  This is the book that got me sewing again after over a decade; I love it.  I’m sure there are better tutorials than mine all over the interwebs. But I thought (since I took copious pictures of the project) I’d share this tute anyway.  
Quilt corners look hard but they really aren’t. 
 
Here we go:  Machine sewing the quilt binding to the quilt. When I got almost to the corner – say, about a half and inch to a quarter of an inch away I stopped, lifted the need out of the fabric and …
pulled the whole quilt otter there.  I took the rest of the binding fabric and
 folded it straight up at a ninety degree angle…
 Then, I folded it straight down.  The fabric should be right on top of the quilt, hugging the edges. 
 Then I turned the quilt so the edge I was about to sew was lined up.
Then put the foot in about a half to a quarter of an inch down and sewed along to the next corner, where I did the same thing again.  I think I clipped the thread but I really didn’t have to.  When I hand sewed up the other side of the quilt, I tidied up the corners.  Picture of that coming up om my next gratuitous mini tute…stayed tuned!

Posted on

Done-zo

Washed and finished.
  My least favorite parts:  The orientation of the stripes is not what I originally intended so it just seems wrong to me.  But, maybe, if you weren’t inside my head, it would look fine. 
And, while I really actually like the edging from a distance; up close, it doesn’t really get along with the colorful stitching.  
 Here are some gratuitous macro shots…just because…
Posted on

Mojo Free

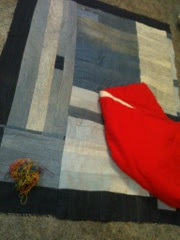
This quilt has been a tough one for me.  I know.  That’s sounds silly to me, too.  But I just never got my typical quilt mojo going with this one.  
But, even mojo free, This one needed finishing.  I picked the edging material out of my stash.  Not perfect but my original thought was using the same material as the backing and that looked terrible. 
With that decision made, I had to plan my CHOPPING IT IN HALF approach.  Scary.
So, the plan was only just coming together in my head when I started cutting. 
 I started by trimming the excess backing and batting which needs doing every time anyway. 
Folding it in half and…….
 CUTTING IT!!  AHHHHH.  No return and a final plan hadn’t been hatched yet.  
But that’s OK.  I think I had to get to this point to visualize what might work.  I added a border strip a little ways up on the quilt
That way, after I ironed it down, it would overlap enough to have some batting behind it.  
Pretty smart, right?  I didn’t want the edge of the quilt to not be soft and stuffy.  Please excuse the excess pictures.  I took 59 shots of this process.  
 I was nervous and I guess it gave me a solid distraction.
OK.  There.
It was still a little too wide for the amount of backing so I trimmed the border all around
 The next step is easy peasy.  I machine sewed the border onto one side, I hand sewed the other side on but I think I’ll save that for another post because this one has gone on long enough.
 I do still have the other half of the blanket to play with.  I can add more quilting if I choose or do something else.  It has no deadline.
 
And there’s still this giant pile of squares to play with…
Posted on 4 Comments

A Sense Of Scale

I’m starting to get excited by this quilt.  I’m using lots of colors to quilt it together and I really like it. 
I want to add a whole bunch more – at least double what I’ve already done.  
 Hmm.  The stitching really isn’t showing up well in the picture but, trust me, it looks really cool on the red side in real life.
So now that things are moving along well, I’m feeling compelled to mess with it and make my life a little harder.
I’m thinking of cutting it in half and making it into two smaller quilts.  Because the thing is just freaking huge for a baby quilt.  It’s really sized for a single bed.  It’s my own fault, I was having too much fun piecing it together and I lost track of the final product.  
I would need to get some more dark denim to border that bottom edge of each on both sides.  I was thinking of adding the red flannel to this side and then the denim on the other just for kicks.  I have to somehow add the batting to the border, too.  
I had this surreal moment when I looked around me to find an object to put on the quilt to give you all a sense of scale:
 Hmm.  Should I use the phrenology head, wooden shoe stretchers, palm reading card, or infant of Prague statue who always hangs out with the wooden, pose-able drawing doll* – wait – I think most people don’t have these things laying around the house.
Hi everyone!
So I used a hotwheels car.   That’s a good sized baby quilt, right? 
*That’s the moment when I started listening to myself.